1 What is NanoEdge AI Library?
NanoEdge™ AI Library is an Artificial Intelligence (AI) static library originally developed by Cartesiam, for embedded C software running on Arm® Cortex® microcontrollers.
When embedded on microcontrollers, it gives them the ability to easily "learn" and "understand" sensor patterns, by themselves, without the need for the user to have additional skills in Mathematics, Machine Learning, or data science.
The NanoEdge AI static library is the code that contains an AI model (for example, as a bundle of signal treatment, Machine Learning model, or optimally tuned hyperparameters). It is designed to gather knowledge incrementally during a learning phase to become able to detect potential anomalous machine behaviors, and possibly predict them.
2 Install / Getting started
The main functions available via the library are:
initialize()
|
run first before learning/detecting, or to reset the knowledge of the library/emulator |
set_sensitivity()
|
adjust the preset, internal detection sensitivity (does not affect learning, only returned similarity scores) |
learn()
|
start a number of learning iterations (to establish an initial knowledge, or enrich an existing one) |
detect()
|
start a number detection iterations (inference), once a minimum knowledge base has been established |

2.1 Static library
The static NanoEdge AI Library is only available via NanoEdge AI Studio in its full version.
- In NanoEdge AI Studio, after obtaining a library, click Compile (on the "Deploy" screen, which follows the "Optimize and Benchmark" and "Emulator" screens)
- Open the .zip obtained
- Select and copy the static library
libneai.a - Link this static library to your project code
2.2 NanoEdge AI Library functions
2.2.1 Initialization
uint8_t NanoEdgeAI_initialize(void);
Initialization can be run at the beginning to initialize the model and/or later to initialize a new model and reset all knowledge.
Returns 0 in case of success.
2.2.2 Learning
uint8_t NanoEdgeAI_learn(float data_input[]);
This function is used to learn patterns in your data. It can be used at any time, in the beginning to build the original knowledge base of the AI model, but also later, as an additional learning phase to complement the existing knowledge.
- Input:
float data_input[], the length of the data isBUFFER_SIZE * NB_AXES.
- Output:***
1means success (the input signal has been learned), other values mean that learning has failed.
2.2.3 Detection
uint8_t NanoEdgeAI_detect(float data_input[]);
This function returns returns a similarity percentage, measure of the mathematical distance between the incoming signal and the existing knowledge, learned by the library.
- Input:
float data_input[], the length of the data isBUFFER_SIZE * NB_AXES.
- output:
- The percentage of similarity [0-100] between the new signal and learned patterns.
- "100" means completely similar, and "0" completely dissimilar.
- The percentage of similarity [0-100] between the new signal and learned patterns.
2.2.4 Setting sensitivity
void NanoEdgeAI_set_sensitivity(float sensitivity);
This function sets the sensitivity of the model in detection mode. It can be tuned at any time without having to go through a new learning phase. This sensitivity has no influence on the knowledge acquired during the learning steps. It only plays a role in the detection step, by influencing the similarity percentages that are returned by the detect function (acts as a linear scaler of the preset internal sensitivity).
- Input:
float sensitivity - Output: None
2.2.5 Getting sensitivity
float NanoEdgeAI_get_sensitivity(void);
This function returns the current sensitivity of the model.
The recommended/default sensitivity is 1. However, this value can be defined by the user depending on his application sensitivity requirements.
- Input: None
- Output: The sensitivity of model.
2.2.6 Getting status
uint8_t NanoEdgeAI_get_status(void);
This function returns the current status of the library.
- Input: None
- Output: The status of the library.
0: the library is successfully deployed and is ready to be used.123: the library is being used on a board that is not authorized (only for libraries that are limited to partner/authorized development boards).
2.3 Backing up and restoring the library knowledge
2.3.1 Creating backups
When using NanoEdge AI Library, knowledge is created on the go. It means that after each learning iteration, the Machine Learning model is incrementally getting richer and richer.
For performance reasons, this knowledge is saved into the microcontroller RAM. Since RAM is volatile, better copy this knowledge into non-volatile memory and prevent its loss (for example, in case of power failure).
NanoEdge AI Library attributes a specific memory section called .neai for the knowledge variables (model hyperparameters). To use it, you need to create a memory section in your linker script according to your microcontroller architecture.
Here is a general outline of the procedure:
- The idea is to create a section called
.neai(for NanoEdge AI) in your RAM, using the linker script that is specific to the board / MCU that you use (it is a.ldfile).
For example, using Arm® Mbed™ for a NUCLEO-L432KC (Cortex®-M4), modify the file STM32L432XX.ld and add the following RAM section:.neai 0x0000000020004000 : { KEEP(*(.neai)) /* keep my variable even if not referenced */ } >RAM
Make sure that the RAM address (in this example, 0x0000000020004000) corresponds to a valid section according to the board and MCU technical documentation. Here it corresponds to the beginning of the RAM0 (Data Space) section, see below: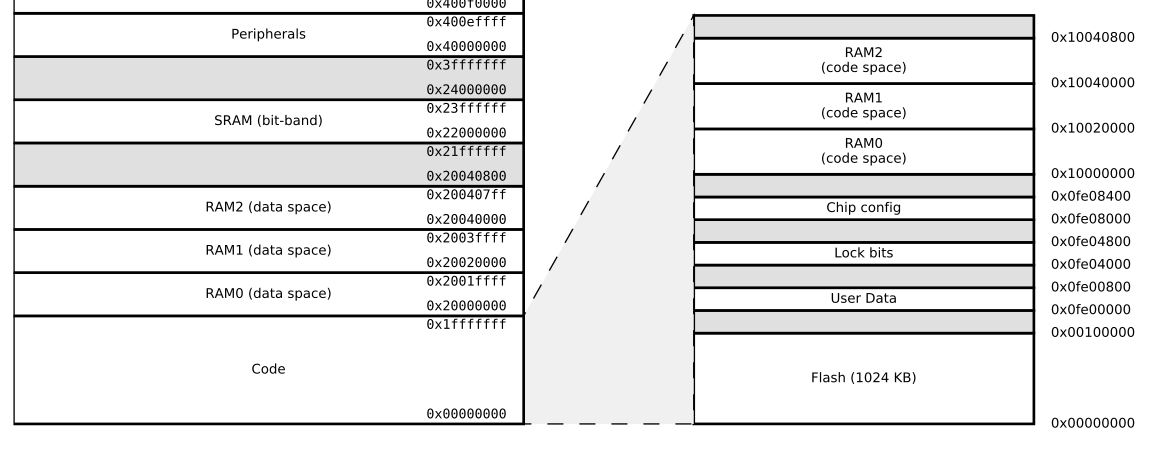
- Then, create two new functions in your main code (containing the NanoEdge AI functions and to be compiled and programmed to the MCU): one function to save the knowledge from the RAM to the Flash memory (dump), and another one to restore the knowledge from the Flash memory to the RAM (load).
How to create these two functions, which write to the RAM or Flash memory, highly depends on the board and MCU used (see their technical documentation). - For the dump function (RAM => Flash memory), indicate the RAM address to start reading from (the .neai section address, such as 0x0000000020004000 in the example above), the Flash memory address to start writing to, and the total size of the knowledge saved in the NanoEdge AI Library (
libneai.a).
You can obtain the size of this knowledge by means of thearm-none-eabi-sizetool:$ arm-none-eabi-size -A libneai.a | grep neai - For the load function (Flash memory => RAM), it is the reverse operation. You need the Flash memory address to start reading from, the RAM address to start writing to (.neai section), and the size of the knowledge to restore.

2.3.2 Restoring backups
To restore a previously saved backup, copy the entire knowledge from the Flash memory back into the RAM .neai section, as explained in step #4 of the section "2.3.1 Creating backups" above.
Then, you are able to use your NanoEdge AI Library functions again.
2.4 Example "Hello World!"
Header file: NanoEdgeAI.h
Example of NanoEdge AI Library header file:
/**
* Copyright (c) 2021 STMicroelectronics.
* All rights reserved.
*
* This software component is licensed by ST under Ultimate Liberty license
* SLA0044, the "License"; You may not use this file except in compliance with
* the License. You may obtain a copy of the License at:
*                             www.st.com/SLA0044
*
******************************************************************************
*/

/* Includes */
#include <stdint.h>

/* Define */
#define NEAI_ID "5d5fd41ec8e0327c934"
#define NB_AXES 3
#define BUFFER_SIZE 256

/* Function prototypes */
#ifdef __cplusplus
extern "C" {
#endif
   uint8_t NanoEdgeAI_initialize(void);
   uint8_t NanoEdgeAI_learn(void);
   uint8_t NanoEdgeAI_detect(void);
   void NanoEdgeAI_set_sensitivity(float sensitivity);
   float NanoEdgeAI_get_sensitivity(void);
   uint8_t NanoEdgeAI_get_status(void);
#ifdef __cplusplus
}
#endif
Main program: main.c
This program must be completed by the user (depending for instance on the applications or the desired features).
/**
* Copyright (c) 2021 STMicroelectronics.
* All rights reserved.
*
* This software component is licensed by ST under Ultimate Liberty license
* SLA0044, the "License"; You may not use this file except in compliance with
* the License. You may obtain a copy of the License at:
*                             www.st.com/SLA0044
*
******************************************************************************
*/

/* Includes ------------------------------------------------------------------*/
#include "NanoEdgeAI.h"

/* Private define ------------------------------------------------------------*/
#define LEARNING_ITERATIONS 100 /* e.g. this value is set by user */

/* Private variables defined by user -----------------------------------------*/
float data_buffer[BUFFER_SIZE * NB_AXES];

/* Private function prototype defined by user --------------------------------*/
/*
 * @brief  Collect data process
 *
 * This function is defined by user, depends on applications and sensors
 *
 * @param  sample_buffer: [in, out] buffer of sample values
 *
 * @retval None
 */

void get_buffer(float sample_buffer[])
{
   /* USER BEGIN */

   /* USER END */
}

/* ---------------------------------------------------------------------------*/
int main()
{
   /* Initialization --------------------------------------------------------*/
   uint8_t error_code = NanoEdgeAI_initialize();

   if (error_code != 0) {
      /* This happen if the library is used in an unauthorized board.
      /* Free version only
   }

   /* Learning --------------------------------------------------------------*/
   int iteration = 0;
   uint8_t learn_status = 0;
   /* e.g.: Stopping criterion for learning process. */
   /* This stopping criterion could be modified by user */
   while (iteration < LEARNING_ITERATIONS) {
      get_buffer(data_buffer);
      learn_status = NanoEdgeAI_learn(data_buffer);
      iteration++;
   }

   /* Set sensitivity of AI model (optional, Input value is set by user)-----*/
   /* NanoEdgeAI_set_sensitivity(1.1); */

   /* Detection -------------------------------------------------------------*/
   uint8_t similarity_percentage  = 0;
   while (true) {
      get_buffer(data_buffer);
      similarity_percentage = NanoEdgeAI_detect(data_buffer);
      /* BEGIN USER */
      /* e.g.: Trigger function depending on similarity_percentage
      /*       (print output, blink LED, ring alarm...).
      /* END USER */
   }
}
3 Resources
Documentation
All NanoEdge AI Studio documentation is available here.
Tutorials
Step-by-step tutorials, to use NanoEdge AI Studio to build a smart device from A to Z.