This article is a tutorial on how to use NanoEdge™ AI Studio to create a multi-state vibrations classifier running on the STWIN SensorTile Wireless Industrial Node development kit (STEVAL-STWINKT1B).
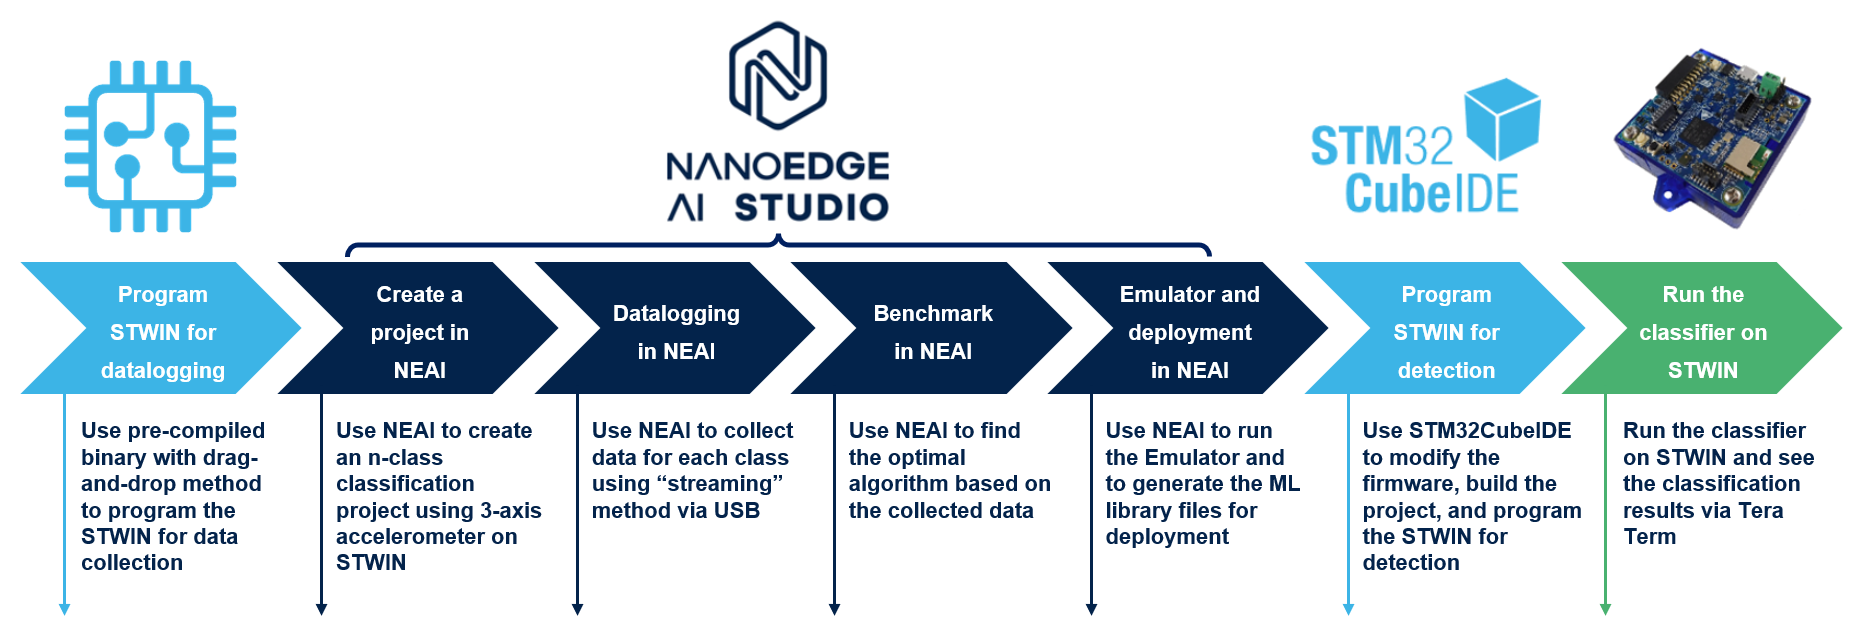
This tutorial shows you how to program the STWIN for datalogging; how to use NanoEdge™ AI Studio to collect data, label data, find the best algorithm, run the emulator, generate the library files for deployment; how to use STM32CubeIDE to modify codes, build the project, program the STWIN, and finally run the classifier on STWIN. The main process of this tutorial is shown in the flowchart below:
1 Prerequisites
1.1 Hardware
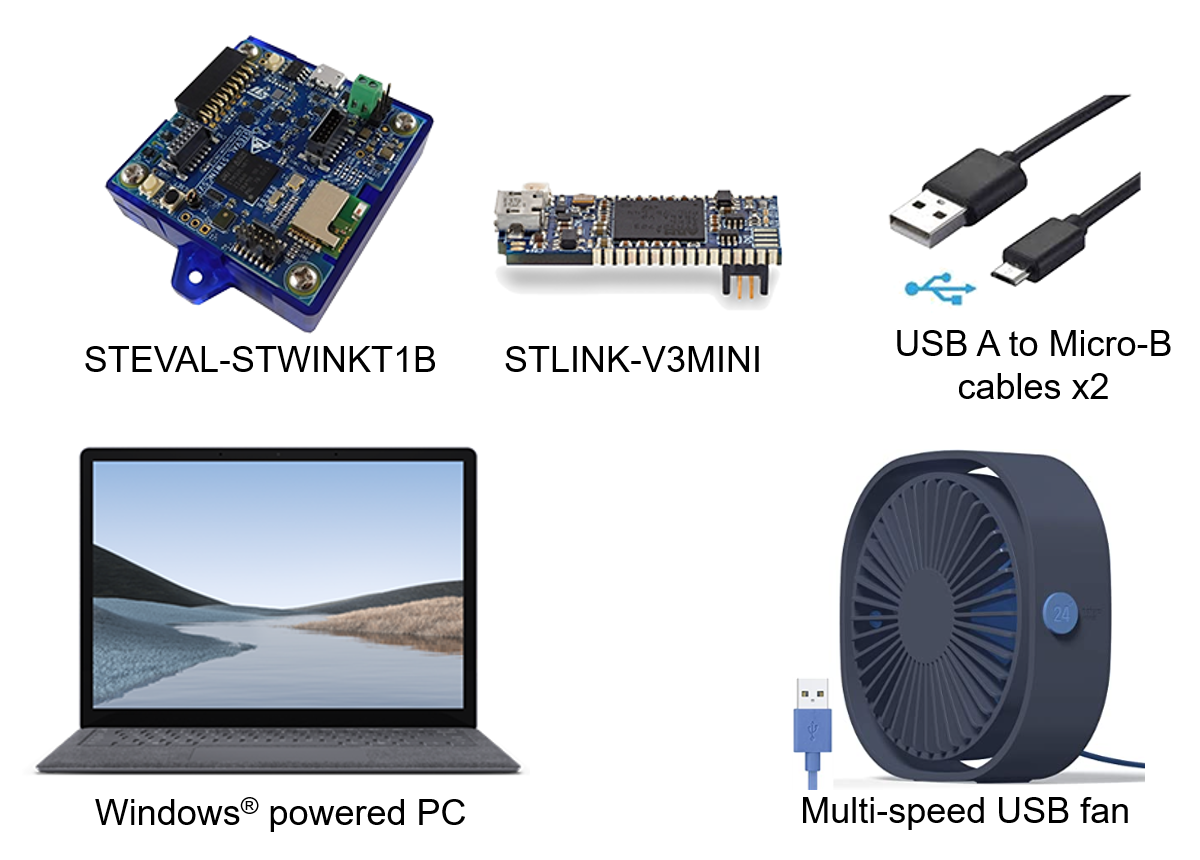
- An STEVAL-STWINKT1B development kit board, called STWIN later in this article,
- An STLINK-V3MINI, which is included in the dev kit,
- Two Type-A to Micro-B USB cables (one to connect the STWIN to the PC, and another one for the STLINK-V3MINI),
- A Windows® powered laptop or PC (Windows® 7, 8, or 10),
- A multi-speed USB powered fan with three speed modes: low, medium, and high.
1.2 Software
1.2.1 Source Code
- A firmware package
stwin-fan-classifier-wiki-package.zipis ready to download from st.com, please download the zip file here. The package includes:
- Project source code in subfolder
STWIN_Fan_Classifier - Two Pre-compiled binary files in subfolder
Binary:
STWIN_Fan_Classifier-datalog.binfor dataloggingSTWIN_Fan_Classifier-detection.binfor detection
- Library files generated by NanoEdge™ AI Studio in subfolder
libneai_stwin-fan-classifier.zip
- Project source code in subfolder
1.2.2 NanoEdge™ AI Studio
- NanoEdge™ AI Studio is a new Machine Learning (ML) technology to bring true innovation easily to the end-users. In just a few steps, developers can create an optimal ML library for their project, based on a minimal amount of data.
- Download NanoEdge™ AI Studio as a free trial version for the STMicroelectronics boards.
- After the registration, you receive the license key in your registered email. It is needed to activate NanoEdge™ AI Studio when you launch it for the first time.
1.2.3 STM32CubeIDE
- STM32CubeIDE is an all-in-one multi-OS development tool, which is part of the STM32Cube software ecosystem. It is an advanced C/C++ development platform with peripheral configuration, code generation, code compilation, and debug features for STM32 microcontrollers and microprocessors.
- Download STM32CubeIDE from st.com
1.2.4 Tera Term
- Tera Term is an open-source and freely available software terminal emulator, which is used to display the classification results.
- Users can download and install the latest version available from Tera Term.
2 Step 1 - Program STWIN for datalogging
The first step is to connect the STWIN to your PC and program it for datalogging mode with the provided binary file.
2.1 Board connection
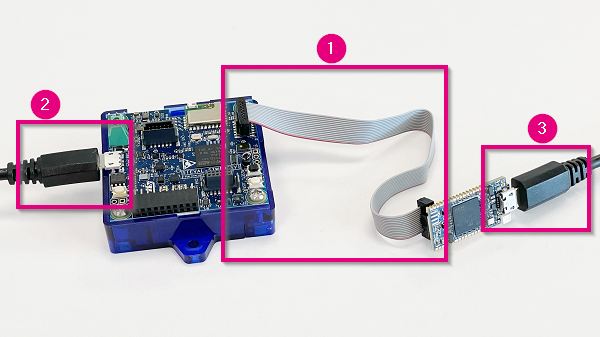
There are three connections to make on the STWIN, as shown in the picture:
- Connect the STDC14 cable between the STWIN and STLINK-V3MINI.
- Plug the USB cable Micro-B side into the STWIN.
- Plug the USB cable Micro-B side into the STLINK-V3MINI.
- Plug the STWIN USB cable into PC.
- Plug the STLINK-V3MINI USB cable into PC.
2.2 Program STWIN using binary file
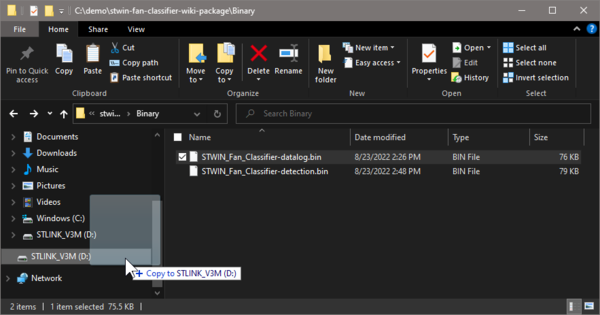
The easiest way to program the STWIN is using the drag-and-drop. Once you have the pre-built binary file in your local disk, the STWIN can be very easily programmed with the binary by simply performing a drag-and-drop action:
- In Windows® File Explorer, find the binary file
..\stwin-fan-classifier-wiki-package\Binary\STWIN_Fan_Classifier-datalog.bin - Left click on the file and hold the left button on your mouse
- Find the STLINK_V3M disk in the Navigation pane on the left hand side, drag the binary to that disk, and release the left button
- When the transfer is done, the STWIN is programmed successfully
3 Step 2 - Create an n-class classification project in NanoEdge™ AI Studio
In this step, we create an n-class classification project in NanoEdge™ AI Studio, and configure the project settings.
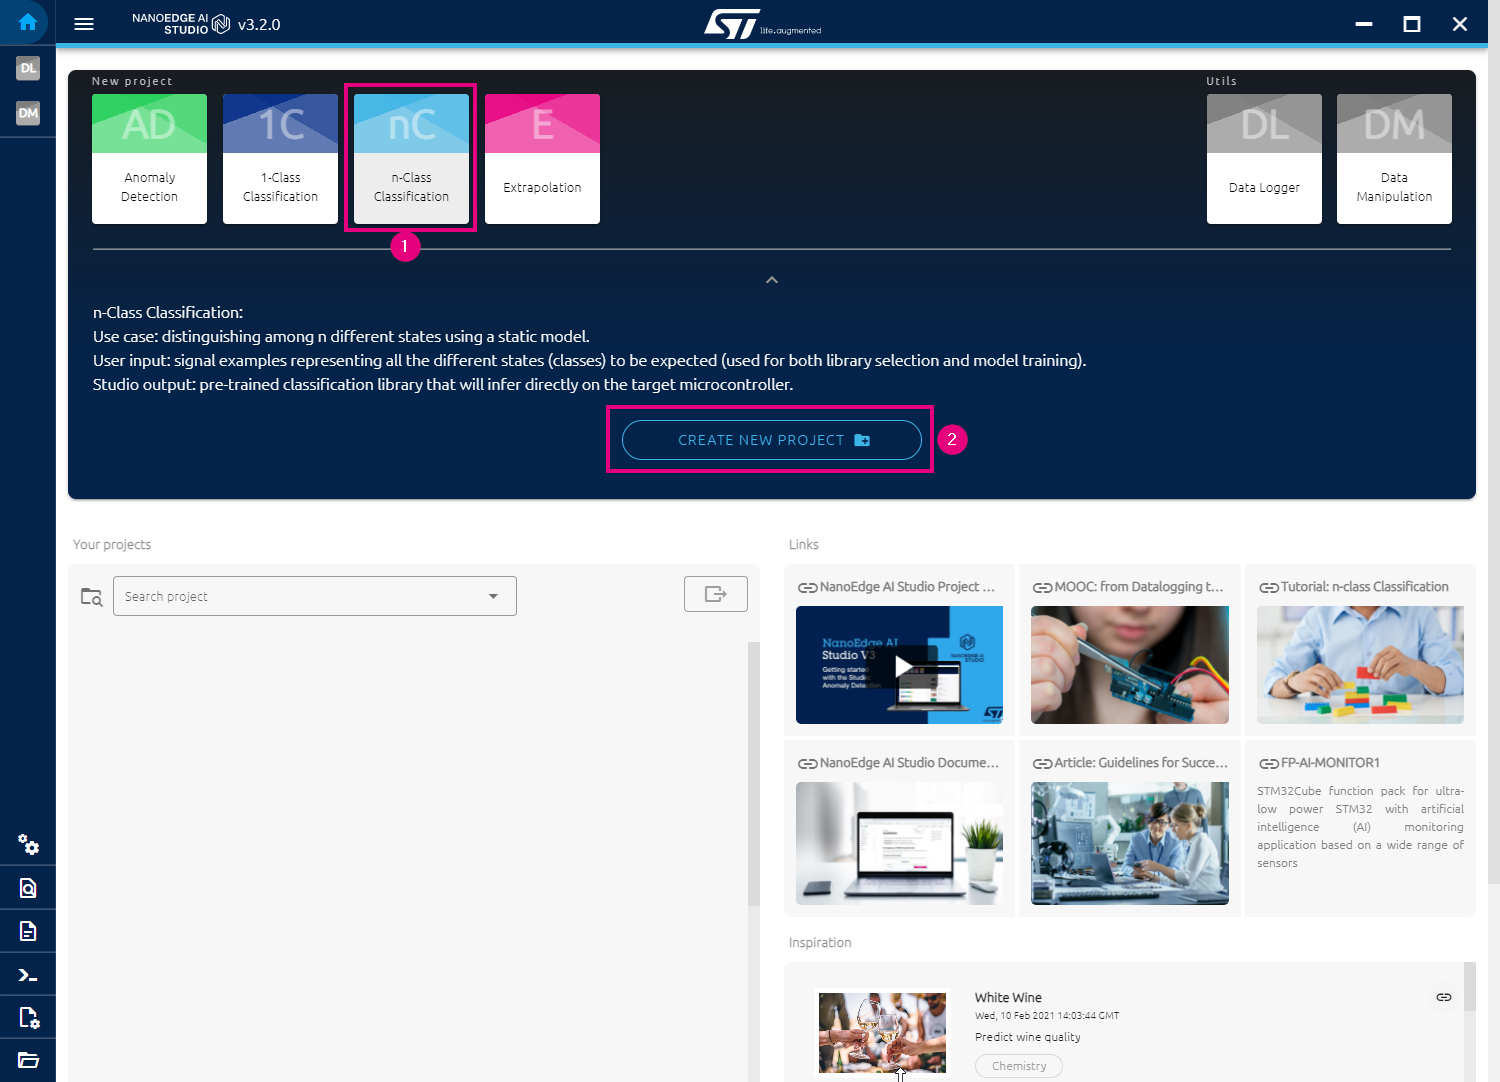
Open NanoEdge™ AI Studio on PC to see the welcome interface below and then follow the steps:
- Click on n-Class Classification to choose it as project type.
- Click on CREATE NEW PROJECT to create the project.
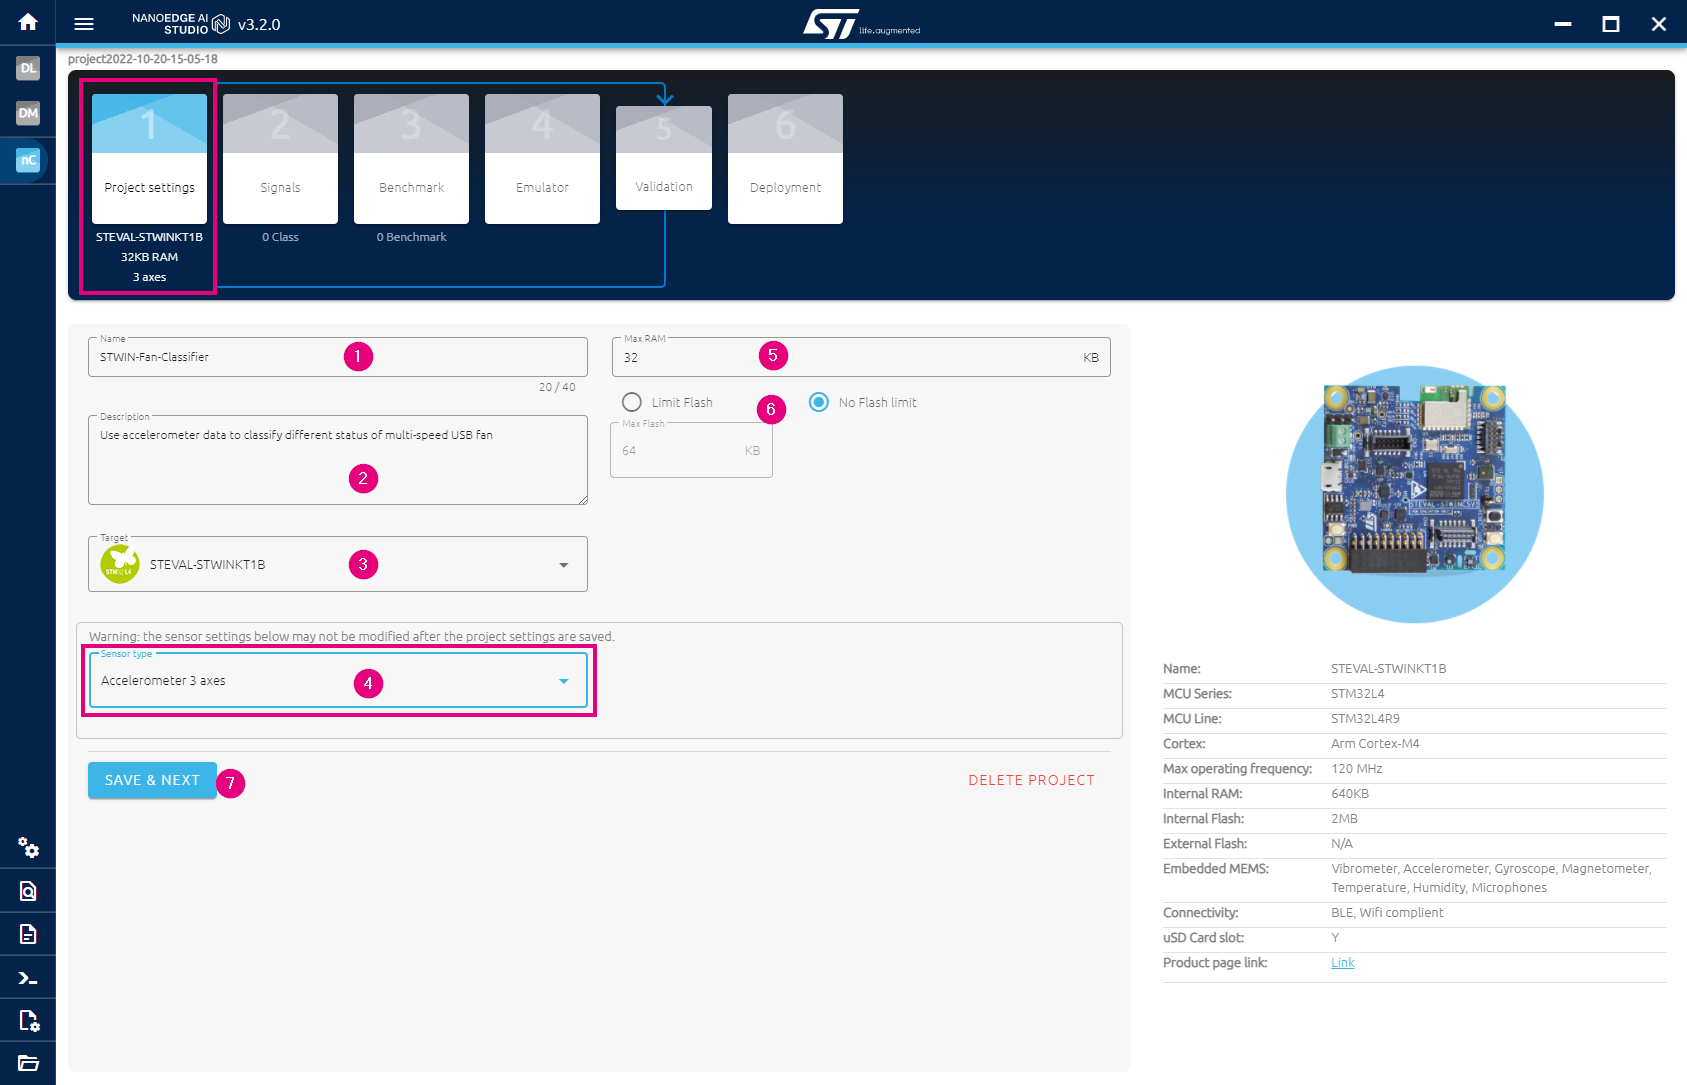
The Project settings page is displayed as shown below:
- Give the project a name, for instance STWIN-Fan-Classifier
- Add a brief description for the project.
- Choose STEVAL-STWINKT1B for Target.
- Choose Accelerometer 3 axes for Sensor type.
- Leave the Max RAM as default.
- Choose No Flash limit
- Finally, click on SAVE & NEXT to go to the next step.
4 Step 3 - Datalogging in NanoEdge™ AI Studio
In this step, we alter the speed of the fan by pressing the button on the back, as well as applying clog to the fan to collect data for seven (7) classes: stop, low speed, medium speed, high speed, low speed clogged, medium speed clogged, and high speed clogged.
4.1 Hardware Setup before datalogging
Before starting datalogging, it is recommended to remove the STLINK-V3MINI from STWIN and power cycle the board.
- Remove the STDC14 cable from STWIN to disconnect STLINK-V3MINI, and unplug STLINK-V3MINI from PC.
- Reconnect the USB cable on STWIN to reset the board. The orange LED blinks when running in datalogging mode.
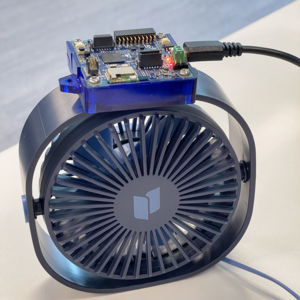
- Stick the STWIN on the top of the fan with double-sided tape (or simply use normal tape to make a ring as double-sided tape)
- Plug the USB cable of the fan into PC or USB charger. Leave the fan in stop mode.
- The final hardware setup is shown below
4.2 Start Datalogging
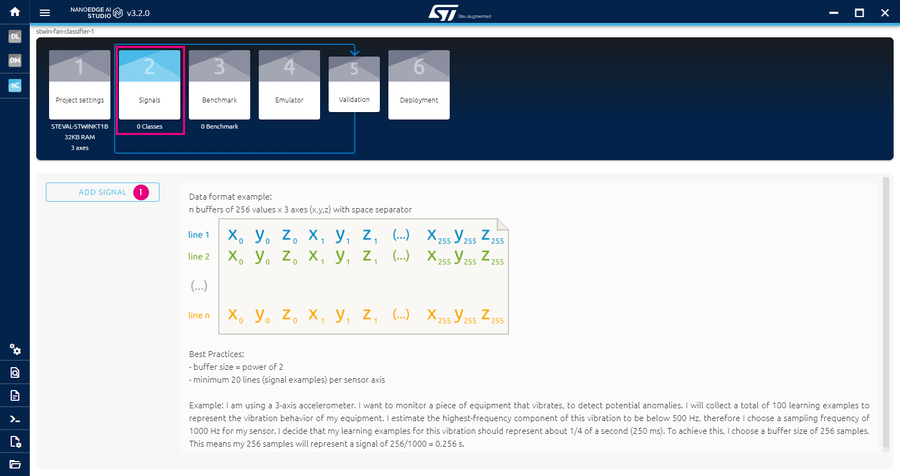
Next, we use the programmed STWIN and NanoEdge™ AI Studio to collect the data for each class via USB streaming. Go back to NanoEdge™ AI Studio, once the project was created, and see the window as shown below:
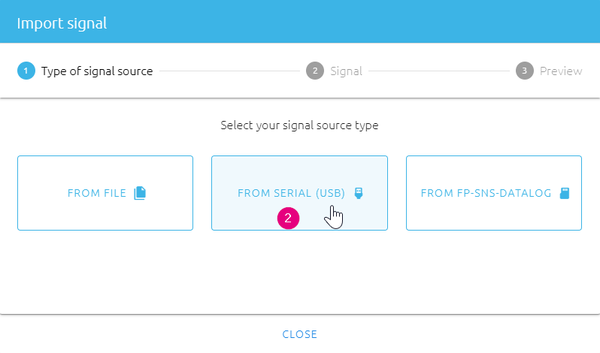
- Click on ADD SIGNAL to open the "Import signal" window.
- In the pop-up window, choose FROM SERIAL (USB) as type of signal source.
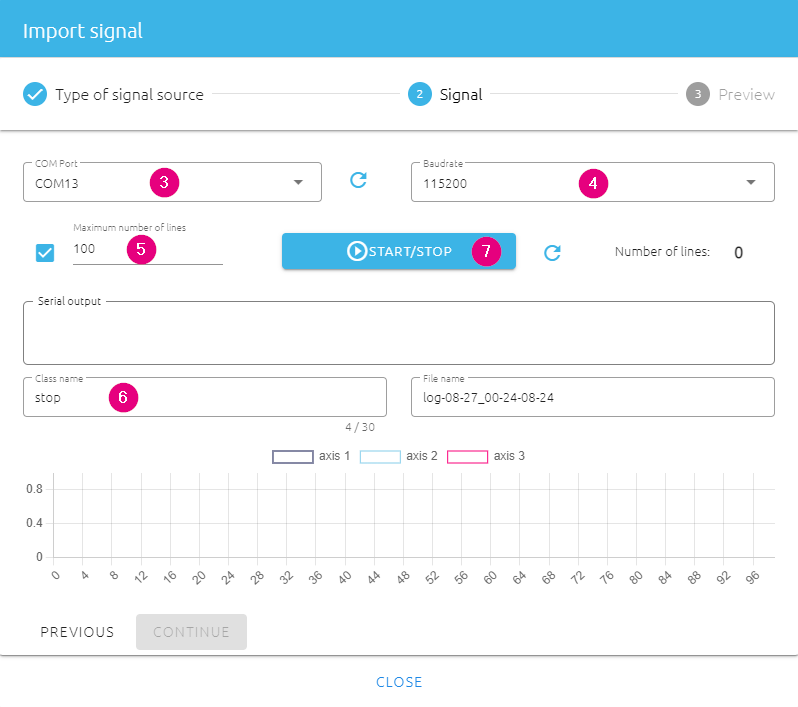
- In the next window, select your Serial / COM port. Refresh if needed.
- Select 115200 for baud rate
- Check the box to define Max lines of 100 signals. By doing this, the data logger automatically stops when 100 lines of signal are collected.
- Give a class name, for instance "stop", which will be used to shown as classification result later.
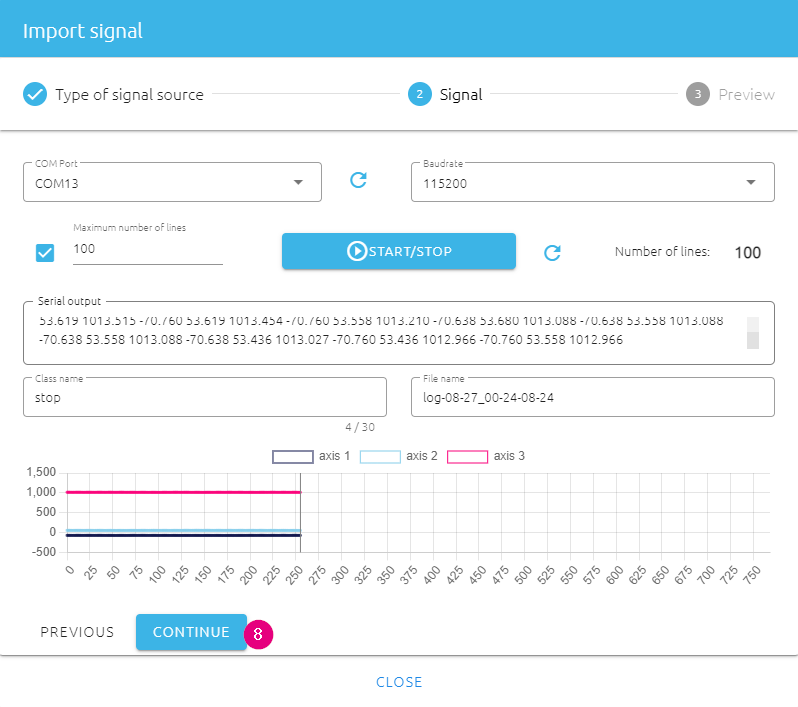
- Make sure that the fan is initially turned off. Then click on the "START/STOP" button to start data logging. The real-time data and plotting are displayed.
- Once 100 lines of signal are collected, the data logger stops. click on CONTINUE to the next step.
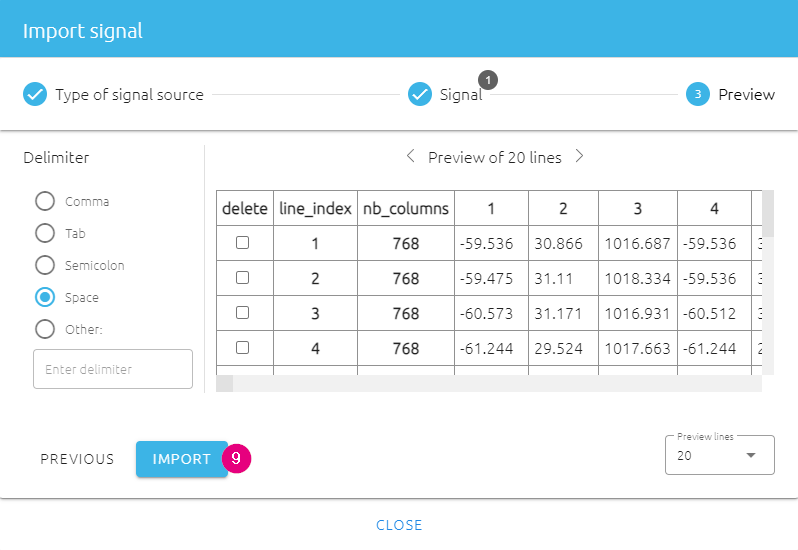
- You can preview the collected data. If no problem, click on IMPORT to finish datalogging for this class.
- Repeat step 1-9 to add all classes
- Press the button on the back the fan to switch its speed between low, medium, and high
- Use a sticky note or a notebook (stick the sticky note or put the notebook closely at the front side of the fan) to clog the fan for clogged classes.
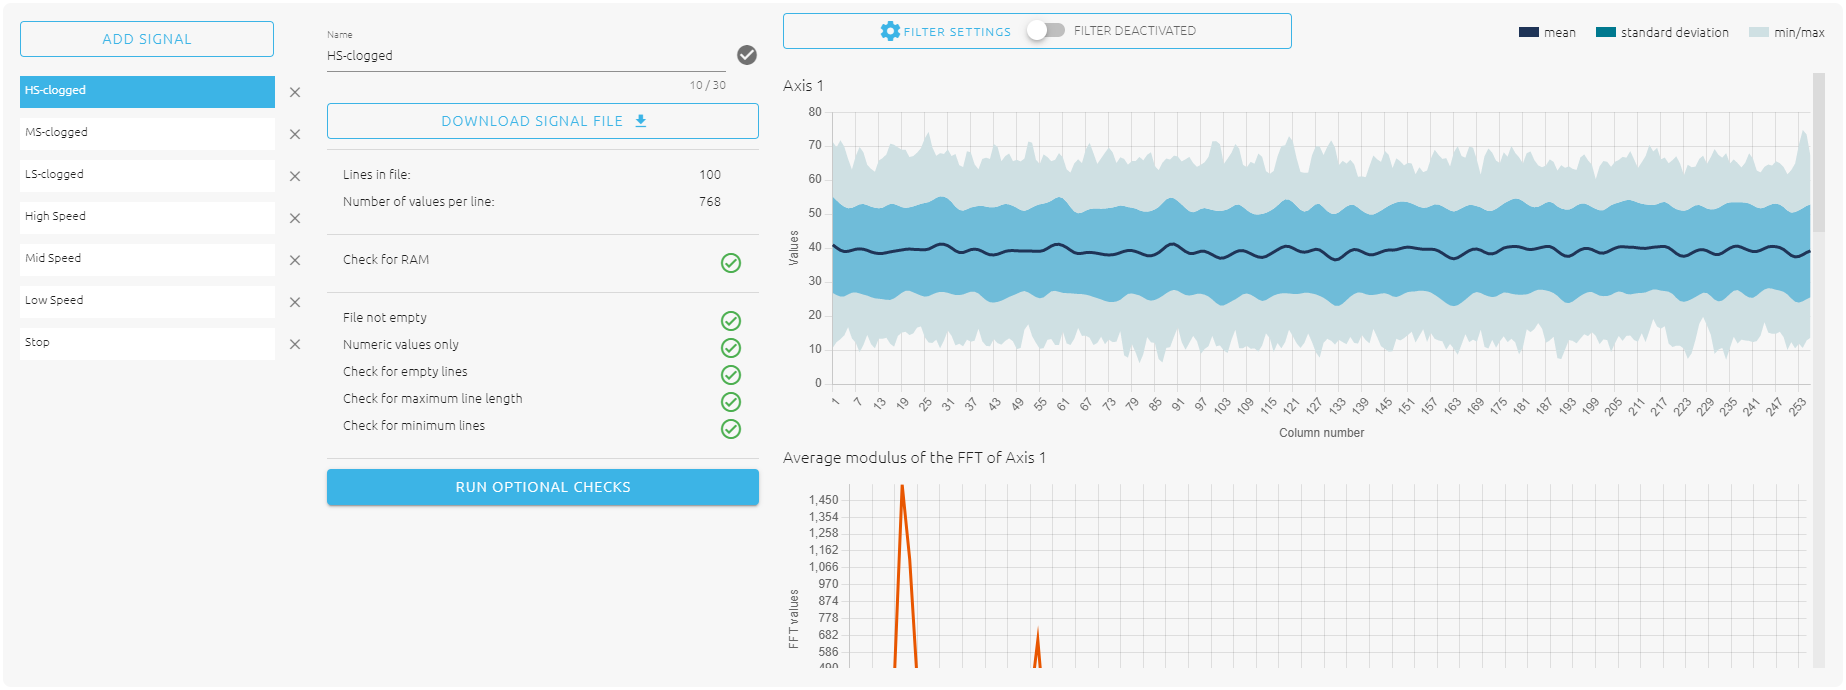
- You have finally 7 classes in total, including stop, low speed, medium speed, high speed, low speed clogged, medium speed clogged, and high speed clogged. The final result is shown below and you are ready for the next step.
5 Step 4 - Benchmarking in NanoEdge™ AI Studio
In this step, we use NanoEdge™ AI Studio to quickly and automatically find the optimized algorithm for our use case.
After collecting the data for all classes, click on "Benchmark" in NanoEdge™ AI Studio. The welcome interface is displayed as shown below:
- Click on RUN NEW BENCHMARK
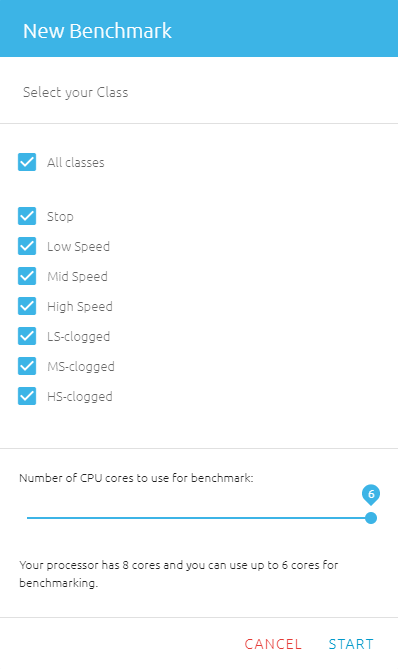
- A "Select your Class" window pops up. Select All classes and click on START.
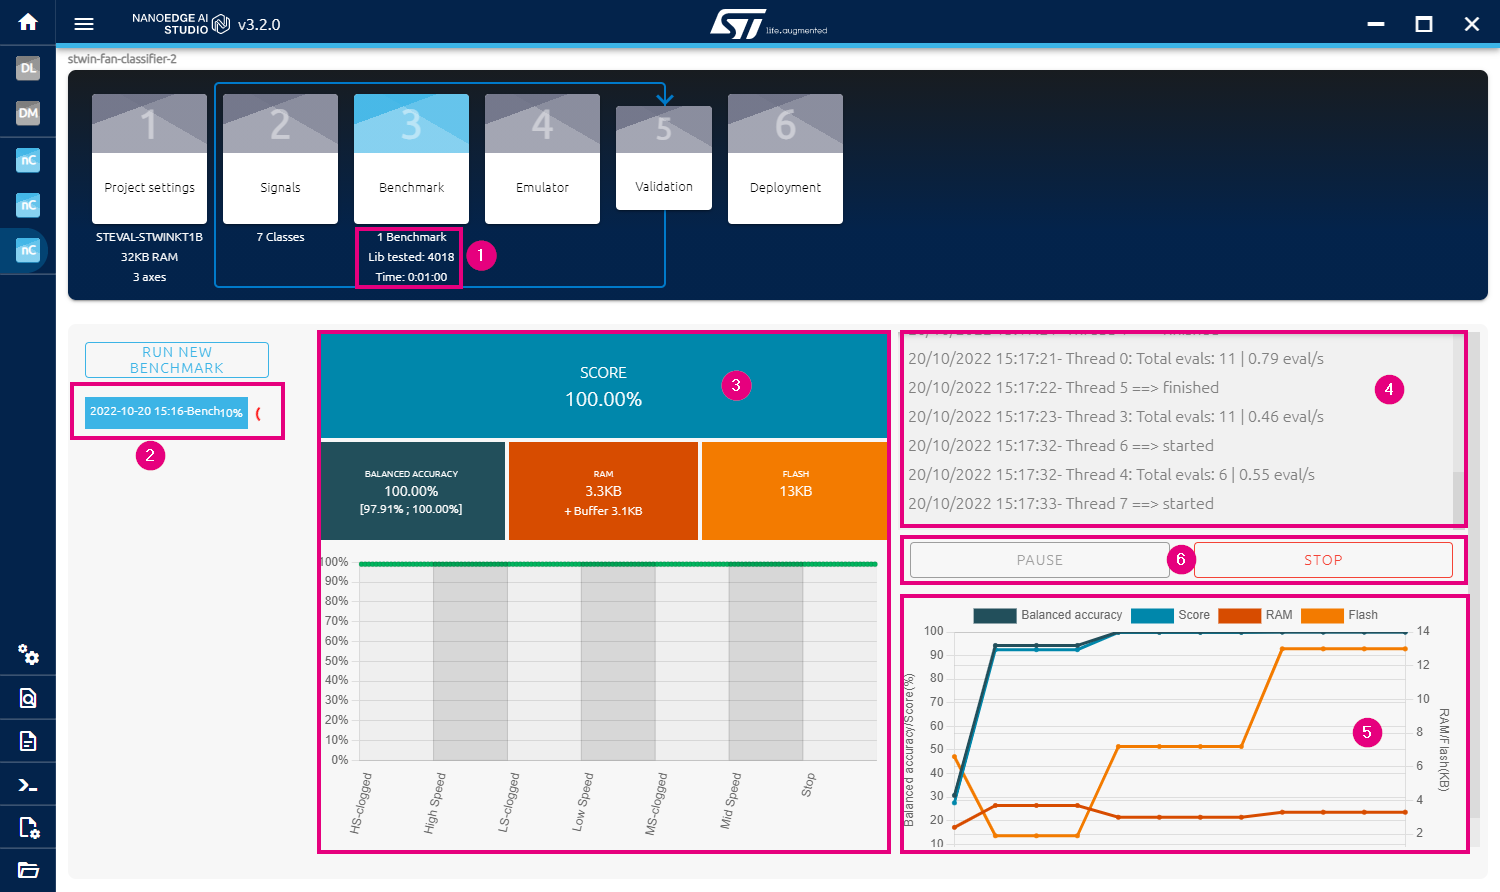
- Then, NanoEdge™ AI Studio starts the benchmarking, displaying the window below:
- This area indicates the benchmark status:
- How many benchmarks have run
- Number of libraries tested
- Elapsed time
- This area shows the progress of the running benchmark and its time stamp
- This area shows the performance indicators. The higher balanced accuracy and confidence level are better, while the lower RAM and flash memory sizes are better.
- This small log window displays notable information and events such as benchmark status, search speed per thread, and new libraries found.
- This graph shows the evolution of the performance indicators over time, as thousands of candidate libraries are tested.
- This area contains control buttons:
- You can pause the benchmark and resume later
- You can stop the benchmark when the desired performance is reached
- This area indicates the benchmark status:
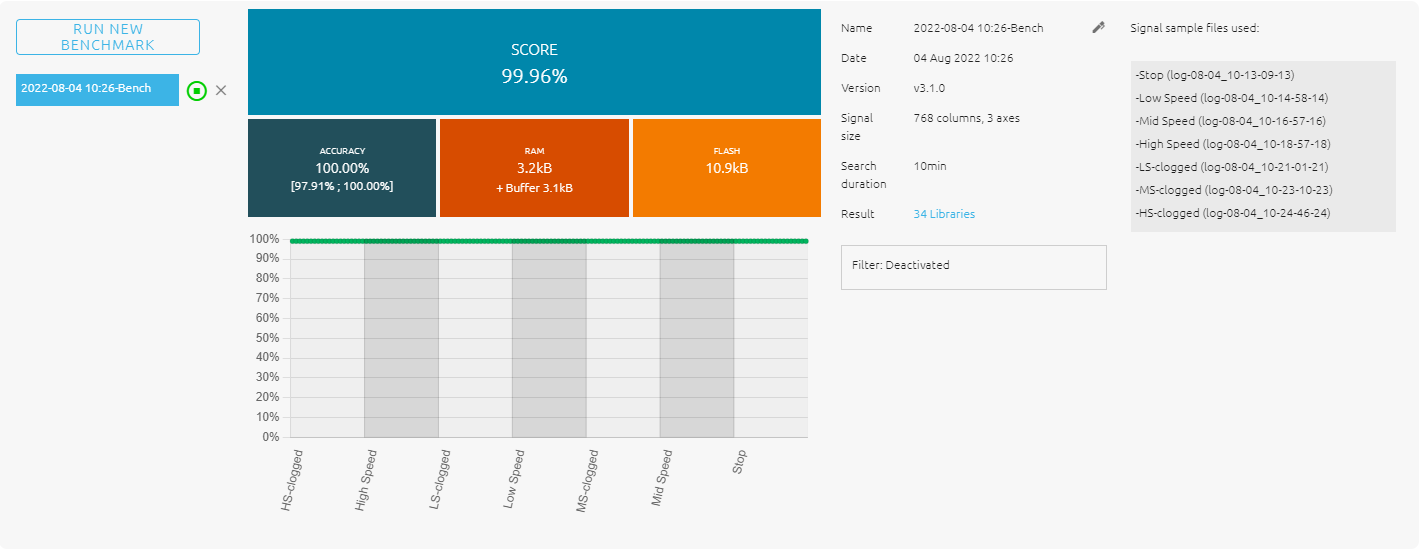
- Once you are satisfied with the performance during the library selection process, click on the "STOP" to end the benchmarking. The optimized algorithm will be selected for deployment later. The details of this benchmark are displayed as shown below:
6 Step 5 - Emulator in NanoEdge™ AI Studio
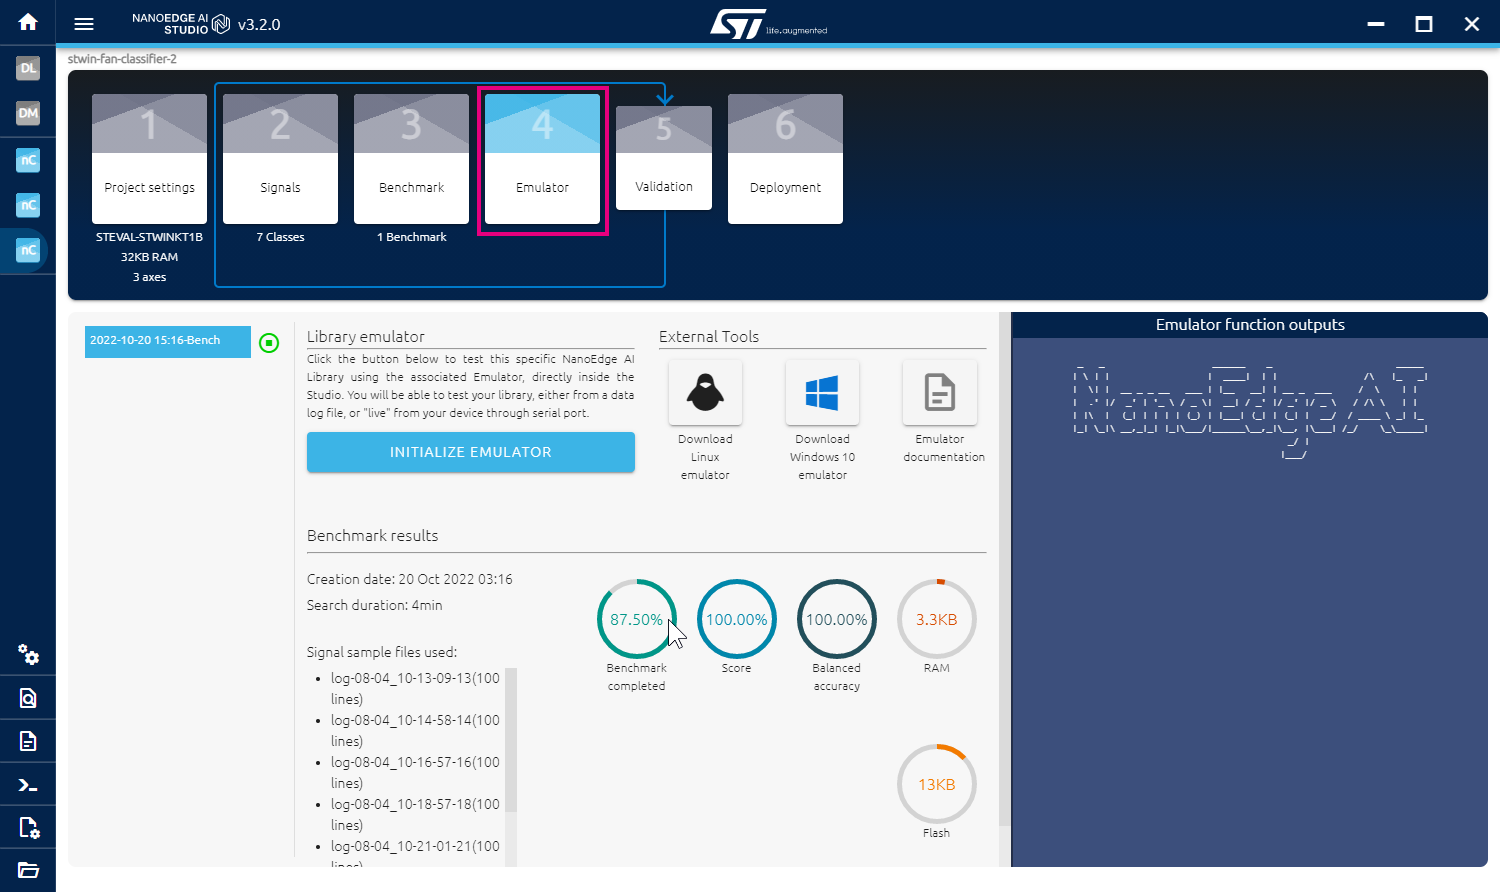
In this step, we use the emulator in NanoEdge™ AI Studio to verify the selected library before we generate and deploy the library files on STWIN.
After finish the benchmarking, click on "Emulator" in NanoEdge™ AI Studio to open the emulator interface.
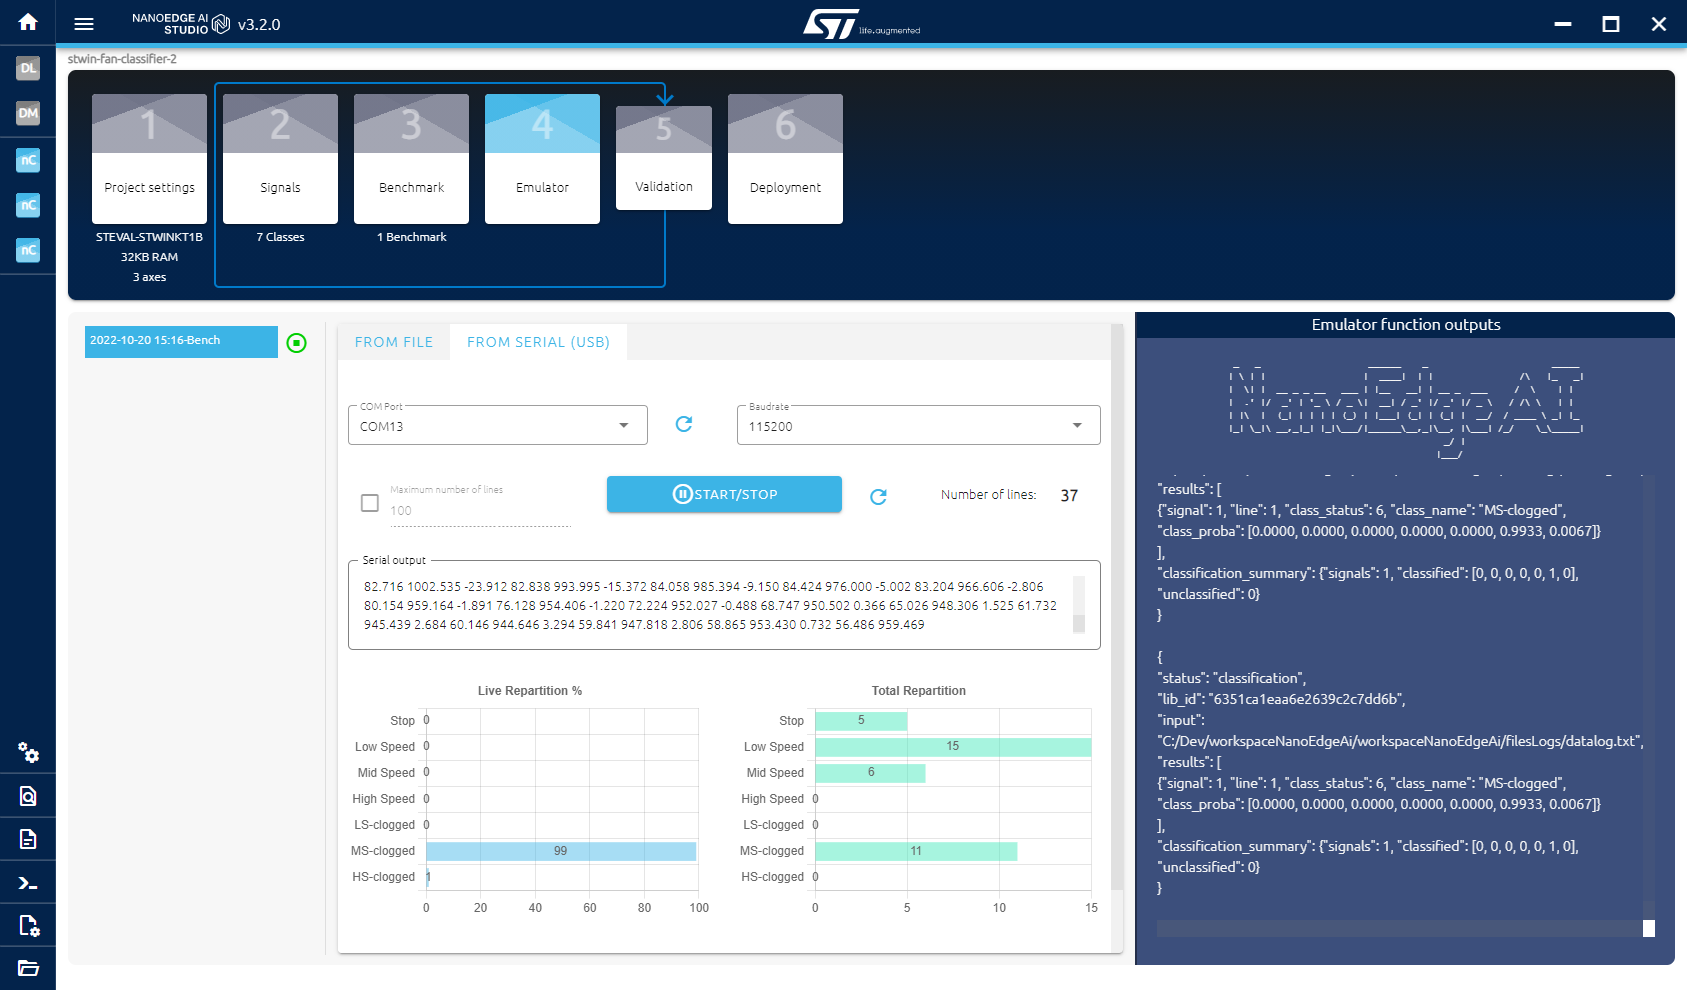
- Click on the INITIALIZE EMULATOR button to open the emulator, and click on the FROM SERIAL (USB) tab. Then the process is similar to Step 3 as shown below:
- Select Serial data as we did in Step 3.
- Select the same COM port and baud rate.
- Get the fan ready in any mode, and click on the "START/STOP" button. The real-time classification result is shown in the Live Repartition as blue bar.
- Swtich between differnt speeds, and add clogs. Check the classification results.
- Click on the "START/STOP" button to stop the emulation.
- If the classification results are not accurate, go back to Step 3 to start over the datalogging and benchmarking process.
- Otherwise you can go to the next step to generate the library files for deployment.
7 Step 6 - Deployment in NanoEdge™ AI Studio
In this step, we generate the library files using NanoEdge™ AI Studio.
7.1 Generate library files in NanoEdge™ AI Studio
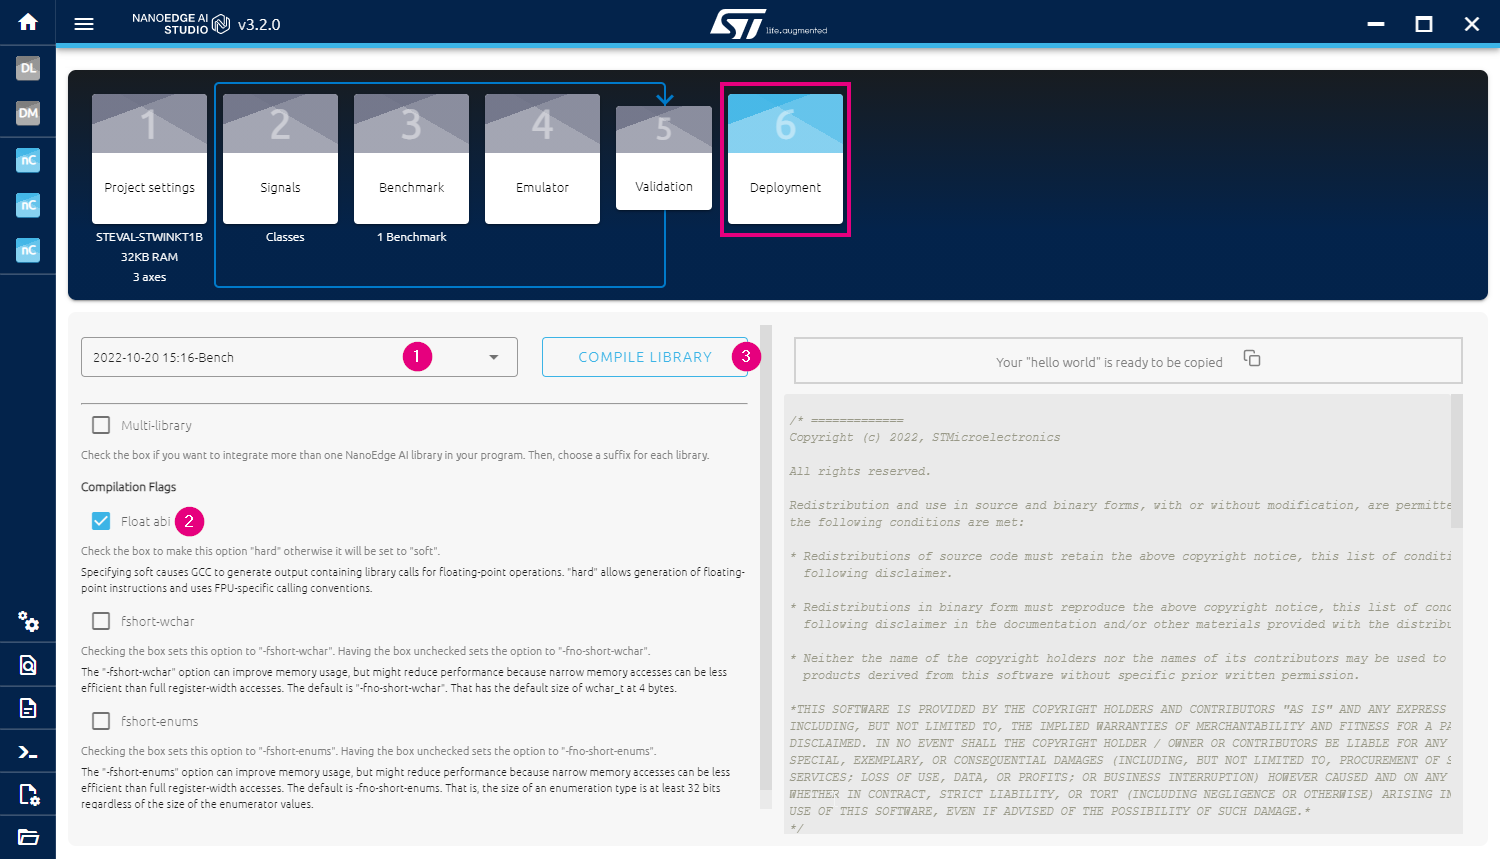
When you finish the emulator, click on "Deployment" in NanoEdge™ AI Studio to open the interface to deploy library generation.
- If you have multiple benchmarks, choose the one you want to compile. Otherwise, leave it default.
- Check the box for
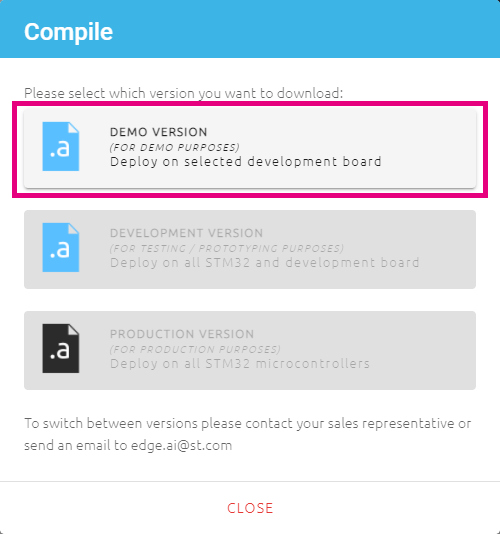
Float abito enable the hardware FPU operations. - Click on the COMPILE LIBRARY button; A pop-up window is displayed as shown below:
- Choose the DEMO VERSION by clicking on it; Then, another pop-up window lets you to choose a local directory to save the libraries:
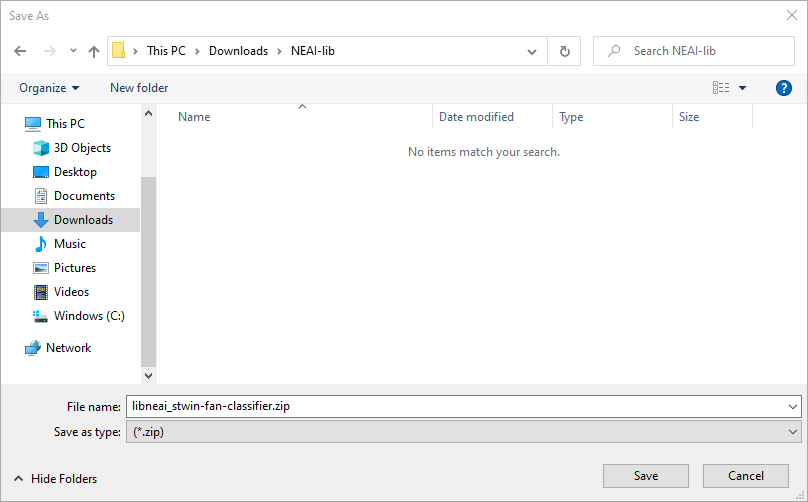
- Locate to a local directory you prefer, rename the file as you want, then click on Save.
- Go to the directory you chose, make sure the file
libneai_*.zipis successfully saved there, extract the file, and you are ready for the next step.
7.2 Library files explanation
The NanoEdge™ AI static library for classification is the code that contains an AI model (for example, as a bundle of signal treatment, machine learning model, optimally tuned hyperparameters, or others) designed to identify a sensor pattern in a class. All classes are defined by the user in NanoEdge™ AI Studio and are used during the training process of the AI model.
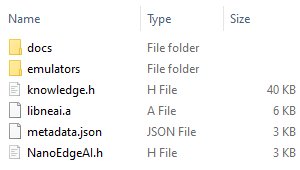
After the zip file is extracted, find these folders and files included:
There are three files needed for the next step: libneai.a, knowledge.h, and NanoEdgeAI.h.
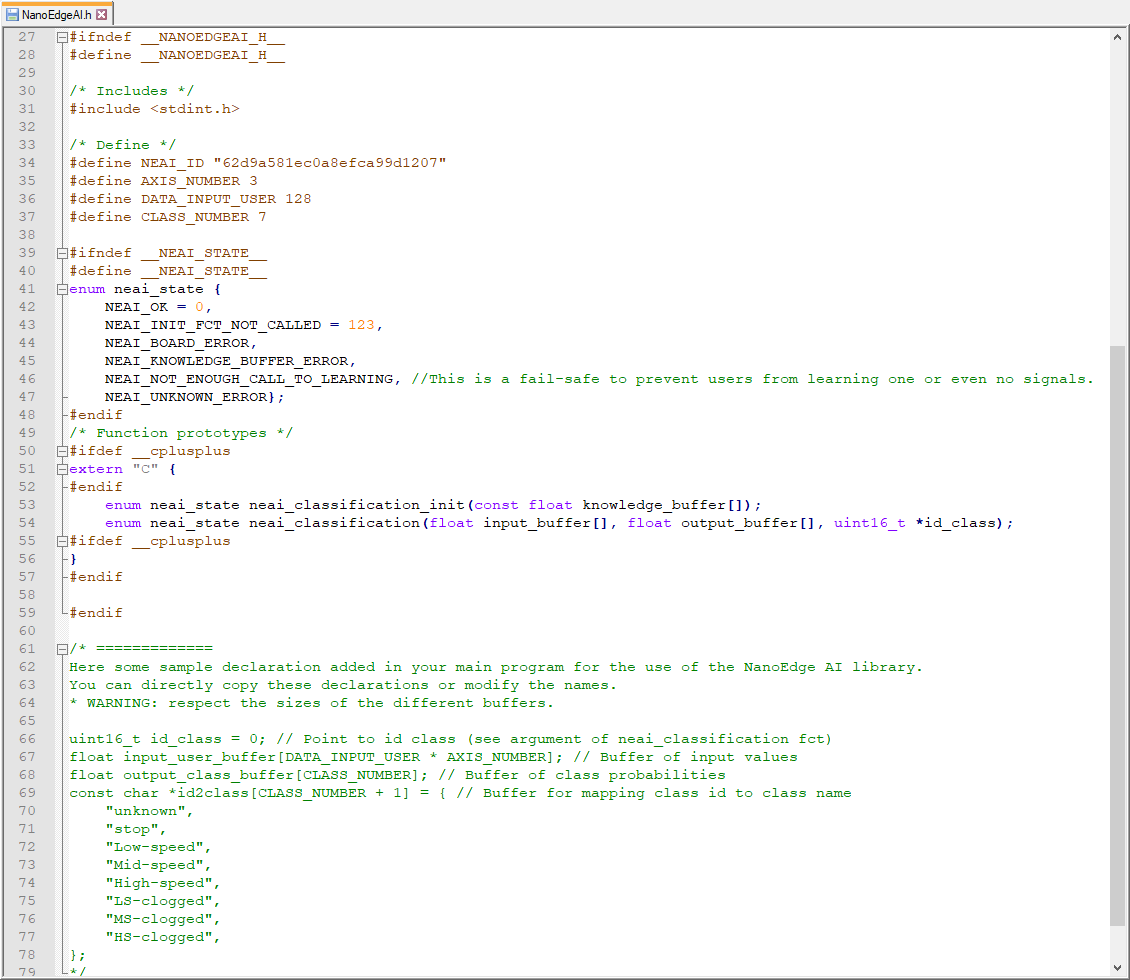
libneai.ais the C/C++ static library for the classifier.knowledge.his the header file that contains the knowledge buffer declaration.NanoEdgeAI.his the header file that contains function prototypes and sample declarations. An example of the code is shown below:
8 Step 7 - Program STWIN for Detection
In this step, we add the library files into the project, import the project into STM32CubeIDE, modify the source code, and then program the STWIN for detection.
- Replace the old library files by the new ones
- Go to the library folder, copy the file
libneai.a - Go to the project folder
..\STWIN_Fan_Classifier\Core\Src, paste the file here, and click on Replace the file in the destination in the pop-up window. - Go back to the library folder, copy the files
knowledge.handNanoEdgeAI.h. - Go back to the project folder
..\STWIN_Fan_Classifier\Core\Inc, paste the files here, and click on Replace the files in the destination in the pop-up window.
- Go to the library folder, copy the file
- Import project into STM32CubeIDE workspace
- Open STM32CubeIDE on your PC, create or choose a workspace and click Launch to launch your workspace.
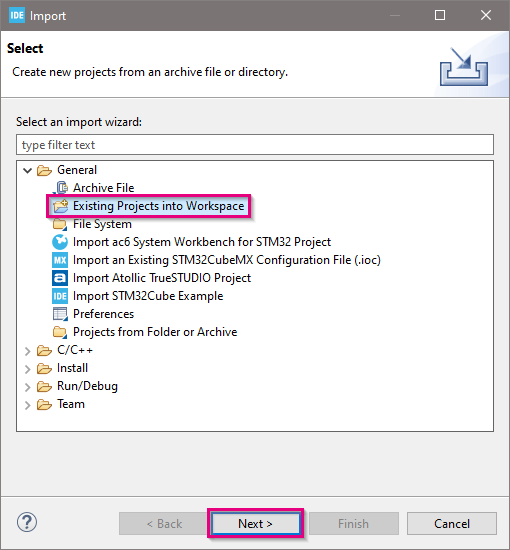
- In the menu bar, click File -> Import...
- In the pop-up window, select Existing Projects into Workspace, and click Next, as shown below:
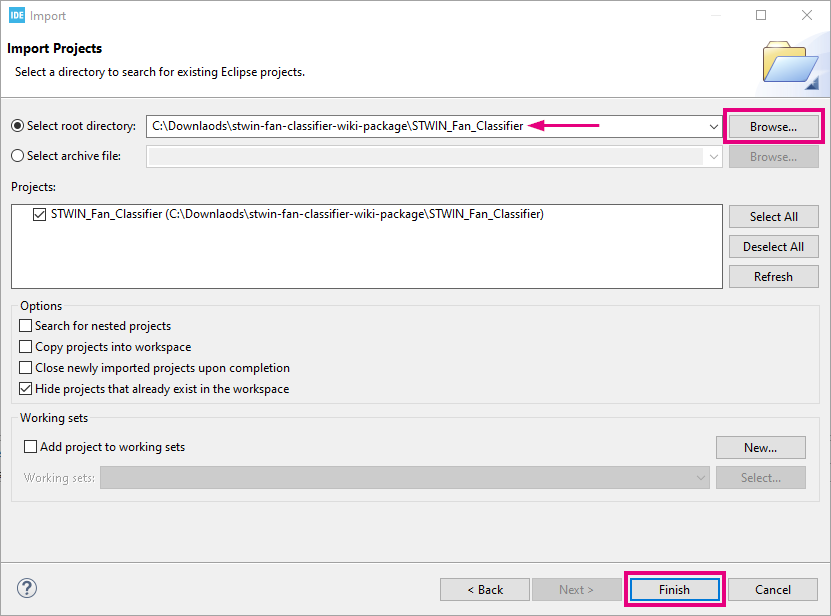
- In the next interface, click Browse..., find the project folder where you saved, click Select Folder, and then click Finish and wait for the project to be imported, as shown in the picture below:
- Build project and program the STWIN
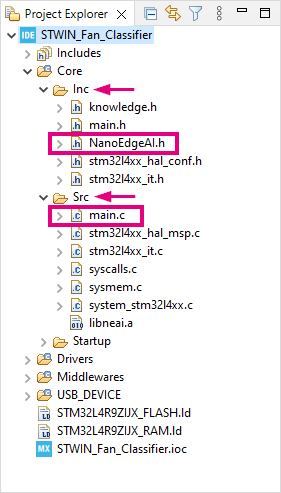
- In STM32CubeIDE, unfold the project in Project Explorer, find
..\Core\Src\main.cand..\Core\Inc\NanoEdgeAI.h. Double click on the two files separately to open them in the Editor, as shown below:
- In STM32CubeIDE, unfold the project in Project Explorer, find
- In
main.c, go to line 48 to find#define NEAI_MODE. Change the value to "1" if it is not, as shown below:
- In
- Then go to
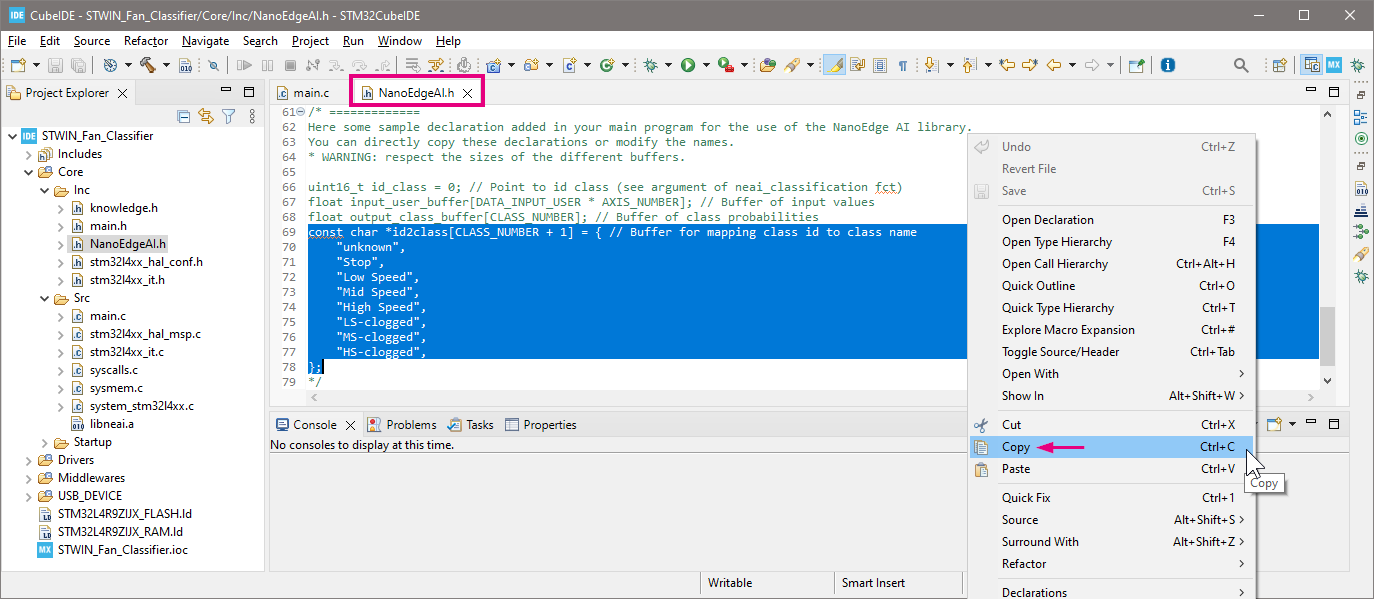
NanoEdgeAI.h, find the buffer declarations in the commented part underneath, select the codes of "buffer for mapping class id to class name"const char *id2class[CLASS_NUMBER + 1]. Right click and choose "Copy" or simply pressCtrl+Con the keyboard to copy the codes:
- Then go to
- Go back to
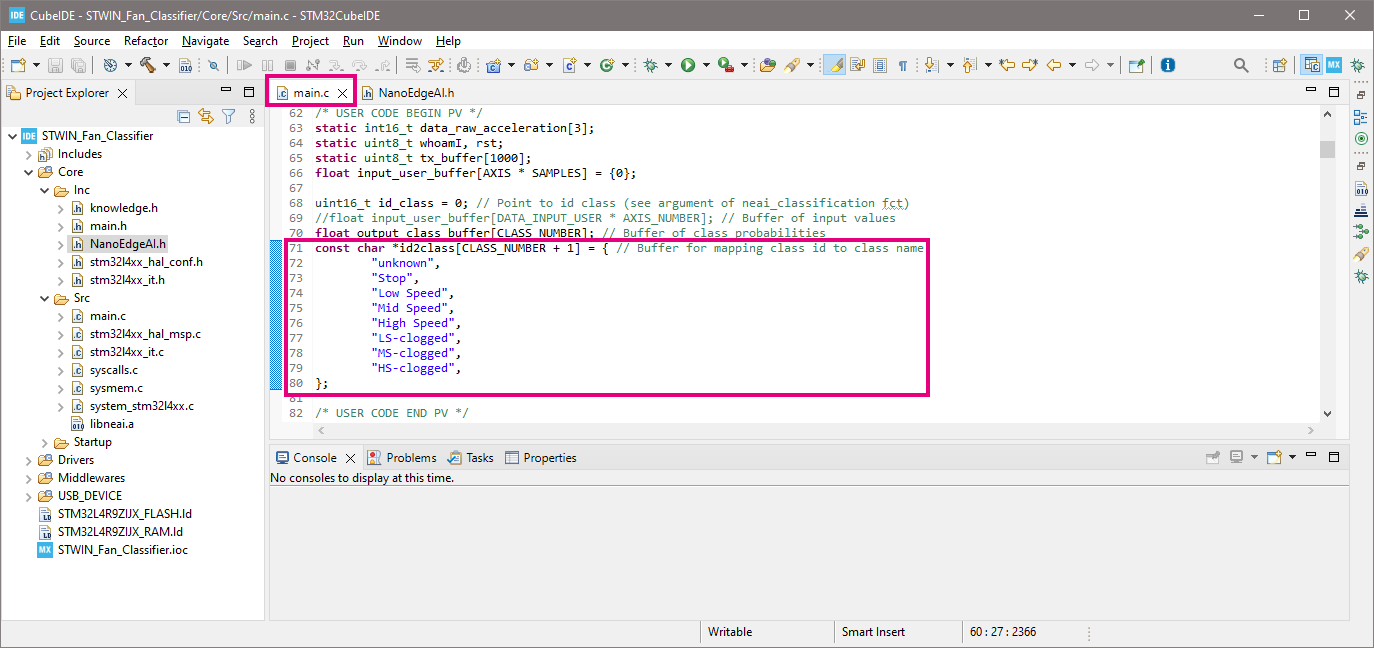
main.c, paste the copied codes belowfloat output_class_buffer[CLASS_NUMBER];to replace the existing declarations. As shown below:
- Go back to
- Press
CTRL + Sto save the changes. - Unplug STWIN from PC, reconnect the STLINK_V3MINI to STWIN with the STDC14 cable; connect STWIN to PC first, then connect STLINK-V3MINI to PC
- Go back to STM32CubeIDE, click on the "Run" button in the toolbar to build and program the project:
- Press
- You can see the log information in the console window. When the project is successfully built and programmed on the STWIN, the following information is displayed:
- The green LED blinks when running in NEAI mode. Now, you are ready for the final step, run the classifier on STWIN.
Download verified successfully

Shutting down...
Exit.
9 Step 8 - Run the classifier on STWIN
In this step, we run the fan classifier on STWIN and use Tera Term to display the classification results.
- Once the STWIN is successfully programmed for detection, you can open the Tera Term on PC.
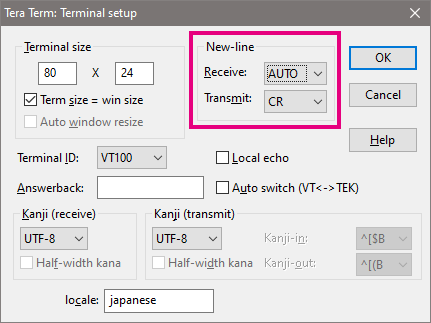
- In Tera Term's menu bar, click on Setup -> Terminal.... In the New-line setting, change Receive to AUTO, and Transmit to CR:
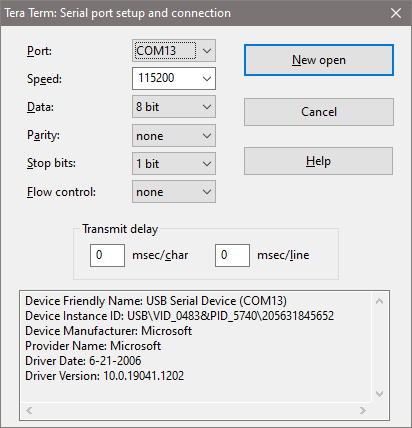
- Go back to Tera Term's menu bar, click on Setup -> Serial port.... The serial port setup window pops up as shown below:
- Select the same COM port as we did in Step 3 for datalogging.
- Select the baud rate value "115200" for Speed.
- Leave other settings as default and click on New open.
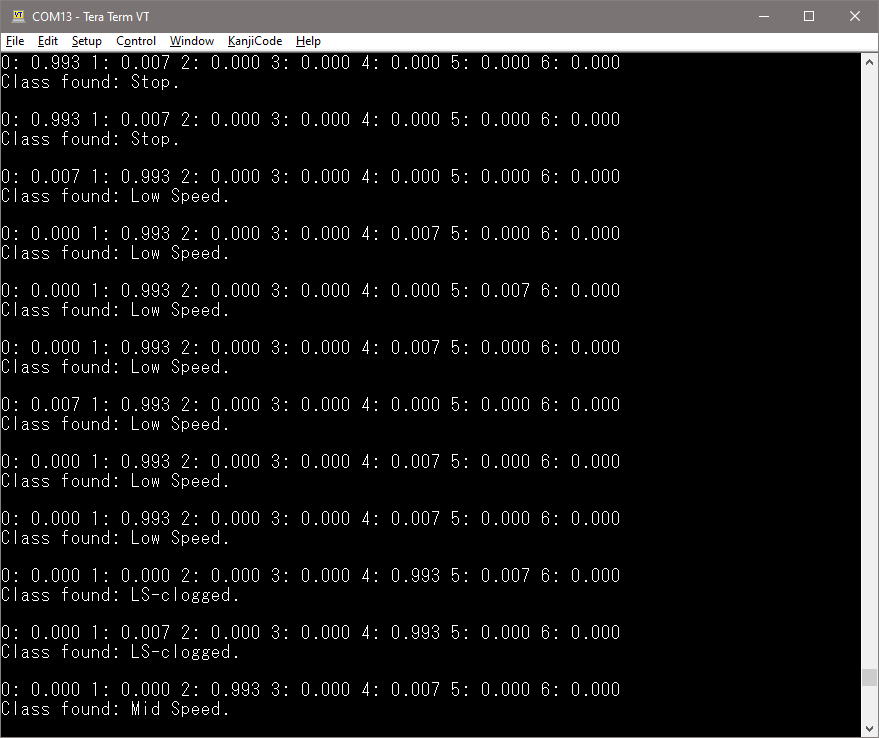
- Get the fan ready and make sure STWIN is firmly attached at the top of the fan. The classification results are displayed in the interface, along with the probability of each class, as shown below:
10 Resources
- Firmware Package - Project source code and pre-compiled binary files
- NanoEdge™ AI Studio wiki
- NanoEdge™ AI Library for n-class classification (nCC) wiki
- UM2777 - How to use the STEVAL-STWINKT1B SensorTile Wireless Industrial Node for condition monitoring and predictive maintenance applications
- UM2237 STM32CubeProgrammer software description
- UM2609 STM32CubeIDE user guide
- How to troubleshoot common NanoEdge AI Studio installation / activation problems
