| Delivery for this distribution is being prepared |
Condition monitoring is a major component of the predictive maintenance systems, allowing production performance improvement, maintenance cost reduction, and a drastic decrease of the downtime due to routine maintenance. The FP-AI-NANOEDG1 function pack helps to jump-start the implementation and development of condition monitoring applications powered by NanoEdgeTM AI Studio, a solution from Cartesiam (a member of the ST Partner program).
NanoEdgeTM AI Studio simplifies the creation of autonomous Machine Learning libraries with the possibility of running not just inference but also the training of the AI on the edge. It facilitates the integration of predictive maintenance capabilities as well as the security and detection with sensor patterns by using self-learning and self-understanding and exempting users from special skills in mathematics, Machine Learning, data science, or creation and training of Neural Network.
FP-AI-NANOEDG1 enables a user to perform the entire design process of the Machine Learning cycle for developing a condition monitoring solution, starting from the data set acquisition to the integration of NanoEdgeTM AI Studio generated libraries on a physical STM32 sensor-node. It runs the inference in real-time on an STM32 sensor-nodes with ultra-low-power microcontrollers, based on the physical sensor data (vibrations) as input.
This article provides a full example of setting up a condition monitoring solution for a small motor using FP-AI-NANOEDG1 V2.0 and SensorTile wireless industrial node (STEVAL-STWINKT1B). The STWIN embeds industrial-grade sensors, including 6-axis IMU, 3-axis accelerometer, and vibrometer to catch any movement precisely, a very high-frequency digital and analog microphone as well as ultrasound spectra enabling fine variation monitoring and also high-precision temperature, pressure, and humidity sensor for challenging industrial environment. The NanoEdgeTM library generation itself is out of the scope of this function pack and must be generated using NanoEdgeTM AI Studio.
Following, this article will provide step by step guides on how a user can use the Function Pack to create a full solution for condition monitoring and monitor if a motor is running in balanced/normal condition or if there are some anomalies such as unbalance or impacts.
1. What you will learn
- To set up a motor control project to control a GimBal motor, (the power and control board, as well as the motor, can be purchased as a single demo package from one of our distributors through STM32 website from this link)
- To log data for normal and abnormal profiles of the motor using motion sensors on STWIN through interactive CLI of the FP-AI-NANOEDG1 V2.0.
- To parse and prepare the logged data for NanoEdge AI Studio using provided Python scripts in the AI_Resources of FP-AI-NANOEDG1.
- To generate suitable AI libraries using NanoEdge AI studio, customized to provide the best results for your system based on the sample data, and
- Finally to integrate and run the generated AI libraries on STWIN on the edge to learn the normal conditions and then detect the anomalies.
- A brief documentation on controlling the hyperparameters of learning and detection to fine-tune the results.
2. Condition Monitoring using NanoEdge AI Machine Learning Library
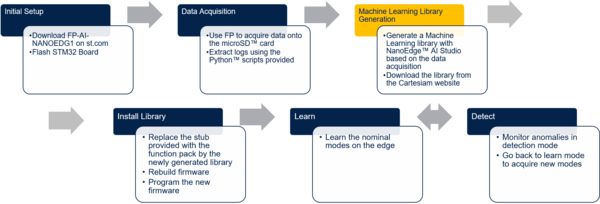
This section provides complete method to set up an application for condition monitoring using FP-AI-NANOEDG1. The steps are provided with brief details in the diagram below.
The details on how to set up the sensor board with function pack as well as data collection have been already provided in the sections above. Following sections provide the details on library generation, installation, training and testing.
2.1. Generating a Condition Monitoring Library
The AI libraries for the condition monitoring for this function pack are generated and provided by NanoEdge AI Studio, a solution provided by Cartesiam. This section provides step by step guide on how to generate these condition monitoring libraries, installing them on the sensor node by linking them to the provided project in FP-AI-NANOEDG1 and then using them to perform the condition monitoring on the edge, by running first in training and then detection mode.
2.1.1. Data Logging for Normal and Abnormal Conditions
The library generation requires some sample data to be provided to the NanoEdge AI Studio. This data will provide the context of the set up to be monitored. The first step is to log the data for the normal and abnormal conditions using the data logging application provided in this function pack. Note that this data is to generate the libraries, so the users are advised to record data by exposing all the possible normal and any known abnormal conditions.
2.1.2. Data Preparation for Library Generation with NanoEdge AI Studio
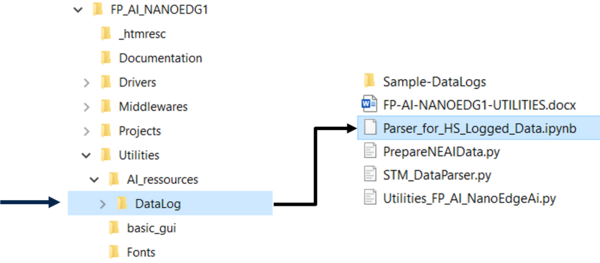
The data logged through the datalogger is in the binary format and is not user readable in its current condition. In order to convert this data to useful form, FP-AI-NANOEDG1 provides python utility scripts. These scripts along with example usage can be found in a Parser_for_HS_Logged_Data.ipynb , a Python Jupyter Notebok, located on the path FP-AI-NANOEDG1/Utilities/AI-resources/DataLog/ as shown in the figure below.
2.1.3. Library Generation using NanoEdge AI Studio
The process of generating the libraries with Cartesiam NanoEdge AI studio consists of five steps.
- Hardware description
- Choosing a microcontroller type : ARM® Cortex® M33
- Maximum amount of RAM to be allocated for the library: Usually a few KBs will suffice (but it depends on the dataframe length used in the process of data preparation).
- Sensor type : 3-axes accelerometer
- Providing the sample contextual data to adjust and gauge the performance of the chosen model. This step will require data for:
- Nominal or Normal case
- Abnormal case
- Benchmarking of available models and choosing the one which complies with the requirements.
- Validating the model for learning and testing through the provided emulator which emulates the behavior of the library on the edge.
- The final step is to compile and download the libraries. In this process the flag mfloatabi has to be unchecked for using libraries with hardware FPU.
The detailed documentation on the NanoEdge AI Studio is available here NanoEdge AI Studio Documentation.
2.2. Installing the NanoEdgeAI Machine Learning Library
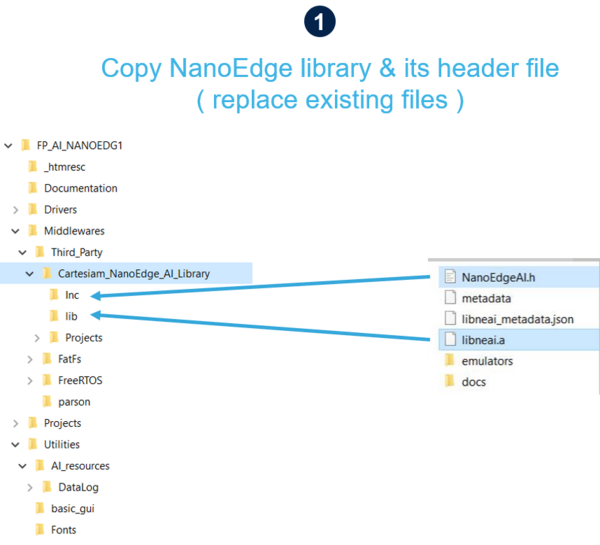
Once the libraries are generated and downloaded from Cartesiam NanoEdge AI Studio, the next step is to incorporate these libraries to FP-AI-NANOEDG1. The FP-AI-NANOEDG1, comes with the library stubs in the place of the actual libraries generated by NanoEdge AI studio. This is done in order to make it easy for users to link the generated libraries and have a place holder for the libraries which are generated through following the steps provided in the previous section. In order to link the actual libraries, the user needs to copy the generated libraries and replace the existing stub/dummy libraries and header files NanoEdgeAI.h, and libneai.a files present in the folders lib, and bin, respectively. The relative paths of these folders are /FP_AI_NANOEDG1/Middlewares/Third_Party/Cartesiam_NanoEdge_AI_Library/ as shown in the figure below.
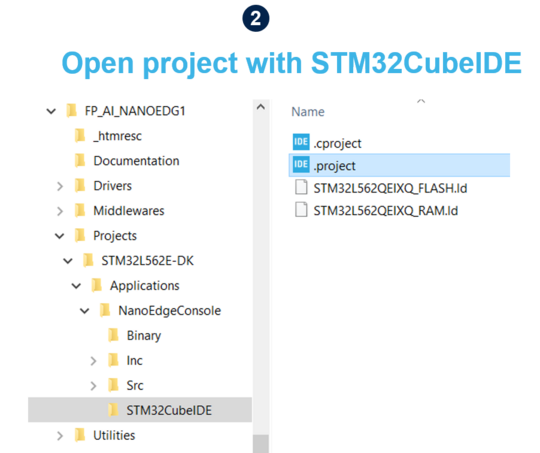
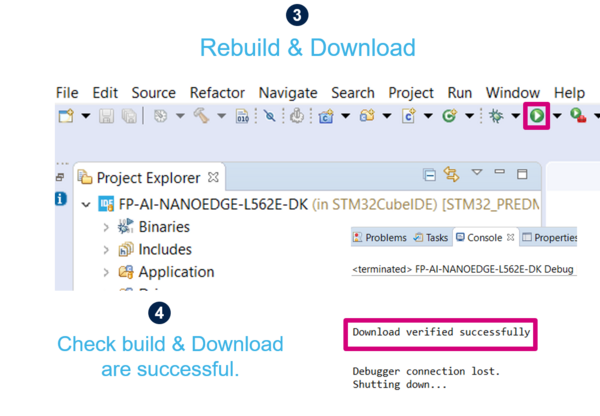
Once these files copied, the project must be reconstructed and flashed on the sensor board in order to link the libraries. For this user needs to open the .project file from the FP-AI-NANOEDG1 folder, located at the path FP_AI_NANOEDG1/Projects/STM32L562E-DK/Applications/NanoEdgeConcole/STM32CubeIDE/ as shown in the step 2 in figure below.
To install the new firmware after linking the library, connect the sensor board and rebuild the project using the play button. See the console for the outputs and wait for the Build and Download success message as shown in step 4 in the figure below.
2.3. Testing the NanoEdgeAI Machine Learning Library
Once the Downoad verified successfully message appears, the generated AI libraries are linked to the firmware on the sensor board and are ready to test.
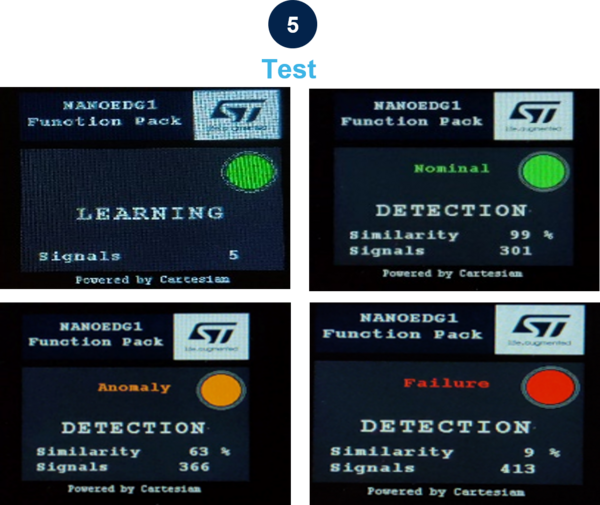
Note that in its current form the libraries have zero knowledge of the normal and abnormal conditions, and to perform the condition monitoring effectively, it is important to learn the normal behavior of the setup/machine to be modeled. This can be done by starting the learning process. The learning phase can be started by issuing start neai_learn command in console. Starting this command will show the process of learning and will show a message on the console every time learning is performed on a new signal, as shown in below code snippet.
$ start neai_learn
NanoEdgeAI: starting
$ 1 signal learning: SUCCESS.
2 signal learning: SUCCESS.
3 signal learning: SUCCESS.
4 signal learning: SUCCESS.
5 signal learning: SUCCESS.
6 signal learning: SUCCESS.
The process can be stopped either by issuing the
$ stop
command or by simply pressing the ESC key on the keyboard.
The alternate way to start the learning process is to long press the user button, as showed in the splash screen of the sensor node. This button can be used to start the learning in standalone as well as in computer operated mode. The process can be stopped by simply pressing the user button again.
Once the normal conditions are learned, the user can start the condition monitoring process by starting the neai_detect mode. This mode can be started by issuing the command
$ start neai_detect
NanoEdgeAI: starting
or by short pressing the user button on the sensor board. The LCD will show the detection mode is activated along with the status through the LED in the screen, Green for Normal, Orange for Anomaly, and Red for Failure, as shown in the screen shots in figure above.
2.3.1. Some Hyper-parameters in Condition Monitoring
For the convenience of the users CLI also provides some handy options to run the inference and learning process of the condition monitoring easily. Users can see all the variables they can play with by issuing following command:
$ neai_get all
NanoEdgeAI: signals = 0
NanoEdgeAI: sensitivity = 1.000000
NanoEdgeAI: threshold = 95
NanoEdgeAI: timer = 0
Each of the these parameters can be configured using neai_set <param> <val> command. The details are provided in the command table above.
This section provides small details on neai_set signals <nr of signals> . Using this command a user can start the learning or condition monitoring mode for a given number of samples. For example, if the user wants to learn on 100 signals, they can issue this command, before issuing the learn command. In the following snippet an example is presented where the learning is performed for 10 signals.
$ neai_set signals 10
NanoEdgeAI: signals set to 10
$ start neai_learn
NanoEdgeAI: starting

$ 1 signal learning: SUCCESS.
2 signal learning: SUCCESS.
3 signal learning: SUCCESS.
4 signal learning: SUCCESS.
5 signal learning: SUCCESS.
6 signal learning: SUCCESS.
7 signal learning: SUCCESS.
8 signal learning: SUCCESS.
9 signal learning: SUCCESS.
10 signal learning: SUCCESS.
NanoEdge AI: stopped
The threshold parameter is used to report the anomalies. For any signal which has similarities below the threshold value is reported as anomaly. The default value used in the CLI application is 95. Users can change this value by using neai_set threshold <val> command.
The sensitivity parameter is used as an emphasis parameter. The default value is set to 1. Increasing this sensitivity will mean that the matching of the signals is to be performed more strictly, reducing it will also reduce the matching calculation process, i.e. resulting is higher matching values.
For details users are invited to read the detailed documentation of NanoEdge AI studio here.
